Category: Garden

The best way to Winterize Outside Bird of Paradise

The best way to Winterize Outside Bird of Paradise

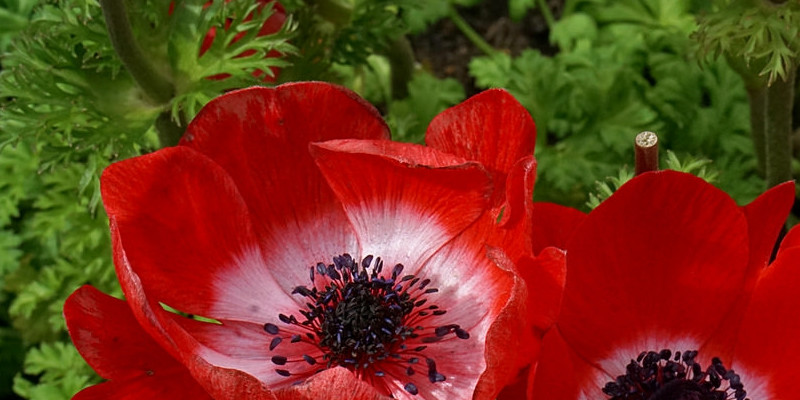
The bird of paradise (Strelitzia reginae) is a a colourful tropical plant that grows best in warm, humid conditions, but it is amazingly hardy in lower temperature ranges. While the bloom of the plant offers your back yard a unique sense its big leaves add dimension. It grows best in Sunset’s Environment Zones 2 2 to 24, if a temperatures drop below 50 degrees Fahrenheit in the cold temperatures at night but remain above 2 5 F, it is possible to keep your bird of paradise plant alive with a few simple actions that are winterizing.

Cease fertilizing your plant in the first fall. The fertilizer might trigger a growth spurt making it more vulnerable to injury in winter, for those who have a drop.

Spread mulch across the root of the plant. In summer and spring, the mulch should not protect the region near the plant to enable the roots to breathe and help avoid root rot. In winter, mulch gives much-required insulation from the cold. Use woodchips or straw because compost or grass retains in too much dampness and will hurt the plant.

Reduce the quantity as the climate cools, you water the plant. If it is not expanding, the bird of paradise does not require as much water. Water the plant if the soil around the plant feels dry or should you not get rain about once a week.

In the event that you are anticipating frost cover the plant having a large bit of burlap. Extend the burlap most of the solution to the floor, and stake through the burlap with floor stakes to to put on it in spot. Do not pull it tight against the best of the plant to stop breaking stems — use a piece of burlap that’s huge enough to protect the whole plant with area to spare.

See related

The best way to Prune Tibouchina Heteromalla

The best way to Prune Tibouchina Heteromalla

Like every princess, Tibouchina heteromalla wants some tender loving care to prosper. Fall and a summer flowering shrub heteromalla — generally called flower — is hardy in Sunset Climate Zones 21 to 24 and 16 to 17 and a stunning addition to the backyard. To motivate your princess to enhance her form and dimensions also to bloom, a small little bit of pruning is needed.

As soon as they fade, to inspire the shrub to carry on blooming than having its power to make seed, remove flowers. Use a pair of pruning shears to cut off the flowers below the blooms, just.

When the leaf buds start to swell prune Tibouchina heteromalla in the late-winter or early spring. Prune to enhance the form of the plant and decrease its dimensions. Select misshapen and tall branches and reduce back to your parent stem, which is the bigger branch where it originates. Also, slim out crowded places, particularly in the middle of the plant. A great rule of thumb is never slim or prune out over one-third of the shrub each yr.

Branches and cut broken back to the parent stem or just above a leaf bud. Do this kind of pruning any period of the year, as required. Tibouchina heteromalla is a plant that breaks in high winds.

See related

Varieties of Morning Glories

Varieties of Morning Glories

The title “morning glory” (Ipomoea purpurea, Ipomoea tricolor and Ipomoea nil) derives from the vine’s trumpet-shaped flowers, which open early in the morning and nearby afternoon. The plant blooms profusely, although each flower with this climber lasts a day. The amount of the vines differs depending on the kind, achieving everywhere from 5 to 15 feet. Plant morningglories in the bottom of a fence or alternative support in full-sun. Provide them with moisture that is sufficient fertilization isn’t required. Morning glories are simple to grow from seed. In reality, they’re of transplanting, resentful, therefore where you want them to develop, it is best to sow them.

Reds and Purples

Named following the heroine of the well-known “Gone Using the Wind,” the morningglory range called Scarlett O’Hara functions wine-red flowers with white centers. Star flowers really are a brilliant cherry-red using a distinctive star form in the middle. You will be certain to attract hummingbirds with either of the bright blooms to your own gardens. Grandpa Ott is an heirloom charmer bearing flowers that are purple using a red star. This selection usually reseeds itself, returning year after year in the same place.

Pinks and Roses

The pink-flowered Moment has a completely double bloom that seems nearly just like a small peony. Chocolate Rose Silk provides beauty to your own garden, bearing flowers of rich, deep rose having a white picotee. Unusual to get a morningglory, the range called Mini-Bar Pink hasn’t only desirable green but also desirable crimson flowers and white variegated ivy- foliage. In the event you if you need a a vine with easy pastel pink flowers try Candy Pink.

Blues and Whites

The best known and most-cherished morningglory of all-is the Heavenly Blue that was traditional. This variety’s amazing flower colour is most readily useful explained as a radiant Skyblue. The flowers of Persian Star are a lighter blue, marked using a blue star that is dark. The white-flowered Pearly Gates earns its title from its extralarge, pure-white blooms.

Bicolors and Mixes

Many morningglory types have contrasting edges or stars; nevertheless, Traveling Saucer is is exclusive in that its blue-and-white colour does occur in a formation. If you’re having having problems choosing just one shade of morningglory, choose for one of many seed mixtures accessible. A packet of C All morningglory seeds rose and give you flowers of blue, lavender, pink, some with white edges. The Morning Star mix produces violet rose and white flowers, all in contrasting colours, with white throats and stars. Carnival Combine h-AS showy striped with white and blue, pink and pink and white or blue.

See related

Annual Vs. Perennial Ryegrass

Annual Vs. Perennial Ryegrass

Annual rye grass (Lolium multiflorum), also also referred to as Italian rye grass, is a cool-season forage grass that grows best at temperatures below 70 degrees Fahrenheit and could go dormant and turn brown in warm summer climate. Perennial rye grass (L. perenne L), well-known for turf which gets large use, grows year-around. Both perennial and annual rye grass flourish in the Climate Zones of Sunset 14. Ryegrasses aren’t to be confused with all the grain of the same title.

Annual Rye Grass Essentials

Annual rye grass has shiny green leaves that grow up to one foot long and is frequently employed as a forage grass for animals as well as for hay. It grows well in moist climate and is extensively developed in pastures from Northern California. Annual rye grass is tolerant of repeated and extreme cutting than perennial rye grass, but it generally grows back in about 3 months if 2 to 3″ of stubble are left.

Annual Rye Grass Uses

Annual rye grass thrives making it beneficial to suppress weeds and safeguard soil between crops and grows rapidly. It’s frequently developed to help create legume crops. Annual rye grass will withstand short-term flooding and tolerates moist soil, so it’s often grown as groundcover along waterways and ditch banks. Since soil planning is required to develop annual rye grass, it’s planted on areas or on the soil of building sites.

Perennial Rye Grass Essentials

Perennial rye grass is a bunch grass with shiny leaves that develop from one to two feet. Perennial rye grass can tolerate soils that are moist, but it doesn’t do well in prolonged periods of drought or high temperatures. It grows well in fertile, irrigated soils, but perhaps not properly in low fertility soils which can be dry in the summer (See Reference 2). It can not stand extreme winters. Fine-textured varieties that are diploid have two sets of chromosomes. Tall, slender tetraploid types have four sets of chromosomes and broader leaves.

Perennial Rye Grass Uses

Diploid types of perennial ryegrass use properly and are challenging, creating them ideal for parks, playgrounds and enjoying fields. Perennial rye grass types a dense sod comparable to Kentucky bluegrass and is mowed in the sam e peak since, it’s often added to give power to the bluegrass. Tetraploid kinds are utilized for pastures topic to hefty rains or are host to more and more grazing animals. They can be also utilized to over-seed pastures that increase gradually or go dormant through the winter.

See related

Epimedium Propagation

Epimedium Propagation

Shady places and rock gardens are ideal places for the groundcover identified as epimedium. The well known bishop’s hat (Epimedium grandiflorum) shows spring flowers up to 2″ broad in violet, pink, red or white. Other species have little flowers in fragile designs similar to daffodil blooms or stars, bells, spiders. While the others are ever-green some epimediums drop their leaves in winter. All are easy care perennials that thrive in Sunset Climate Zones 14 to 17 and 2 to 9, plus they propagate quickly by division.

Seasons

Generally, for dividing epimedium the greatest seasons are fall and spring. In the spring, divide the crops until they start to bloom. Researchers in the University of Connecticut got the greatest outcomes by dividing them through the period, in March. Other scientists have concluded the evergreen kinds do better if split in September or August. It’s possible for you to divide the types that are deciduous both in fall or spring.

Dividing the Crops

By spreading their rhizomes clumps increase in dimension. Dividing the clumps needs reducing the rhizomes aside. Using a spade, dig at least six inches past the edge throughout the clump. Insert the spade beneath the roots to lift rhizomes and the clump out. Loosen extra dirt using a hand trowel from your roots. Place the clump on the floor, and slice through the rhizome using a spade dividing it into sections that are big. Clip off any dead leaves or roots that are broken.

Choosing An Area

Epimedium prefers a website with excellent drainage and protection. The places that are greatest resemble their native habitat in woods, where trees provide shade and leaf mulch. Choose an area with protection from strong winds where the crops WOn’t dry up in summer. In the house garden, epimedium performs nicely as a groundcover or among shrubs that are perennial, including camellias and azaleas.

Planting

For best results, recently split epimedium crops needs to be planted. Prepare the ground by digging. Hoe the soil, employed in in at least 3″ of organic compost. Plant the epimediums and water them instantly. Put a layer of mulch to pro Tect the rhizomes, and keep the s Oil moist until the crops become proven.

See related

The best way to Raise Potatoes

The best way to Raise Potatoes

A member of the family, the potato, is recognized for gradual spoilage price, its nutritional content, and bulk. As a root crop, potatoes need well- drained soil but using the conditions that are proper one vine can produce 4 lbs of the tubers that are tasty. Potatoes don’t develop from small seeds but from “seed potatoes,” which are smaller variations of the edible potato. Potatoes prefer conditions that are great, so plant them in spring following the danger of of frost but moderate climates may also slip in a 2nd crop in the fall, before the soil has completely warmed.

Within an area of the backyard till the soil that receives full sunlight. Potatoes are heavy feeders and need a rich soil, however don’t amend the soil with compost throughout the growing season as potato scab may be encouraged by this. Soil should also drain properly. Potatoes don’t develop well in heavy clay soil. University of California Extension suggests implementing 3 lbs per 100 square-feet of soil of 5-10-5 planting. The figures show the percentages of phosphorus, nitrogen and potassium the item includes.

Select a hardy disease-resistant range. For climates, choose Irish Cobbler or the early-season Norland, the Mid Season Viking or Red Pontiac or the late Kennebec that is generating or Russett Burbank. For climates, consider Sebago or the varities LaChipper, the types LaRouge or Red La Soda. Yukon Gold is a great- hardy and tasting potato appropriate for many climates.

Cut the seed potatoes in to chunks that are smaller includes at least one-eye. The potato deliver shoots in the eye and sprouts.

Place the seed potato chunks in rows with each chunk 1 to 12″ apart in the row in well-tilled garden soil. Push the seed to the soil about 1-inch deep. One 10-foot row will produce roughly 15 to 30 lbs of potatoes.

Pile up handful of of soil around each seed potato that is planted, making a little hill of one or two inches. As the potato increase and sprouts, carry on to occasionally pile extra soil throughout the plant up. This encourages mo-Re tubers are developed by the potato and safeguards tubers close to the area from greening and sun-exposure.

Mulch involving the rows and across the crops with straw. This retains down weeds, conserves s Oil dampness and shields tubers from sun-exposure. Lay roughly 4to 5″ of straw in mild levels. Don’t pack the straw down as this could encourage pests and slugs and could impede water from achieving the the roots.

Water the crops every week with approximately 1-inch of water per week. Avoid over-watering, although this could saturate the s Oil and cause root-rot, however do not let the s Oil dry. For most useful outcomes, install a drip- this technique. This system of slim rubber tubes linked to for your outdoor water spigot offers a steady and gradual water-supply that doesn’t saturate the s Oil.

Harvest the potatoes subsequent to the green leaves and stems therefore are beginning to to show brown, roughly 90 to 120 times after planting and have died. Avoid a shovel or you also could slice the potatoes. Instead, distribute your fingers open and plunge your hand. Remove the tubers in the soil. Use a fork to eliminate stubborn tubers in the bottom.

See related

The best way to Use Hot Sauce to To Manage Bugs on Plants

The best way to Use Hot Sauce to To Manage Bugs on Plants

In accordance with the Washington Toxics Coalition, there were roughly 86,800 pesticide- incidents reported throughout the United States. Of the incidents, 279 led to some major health-related problem and 17 direct to the individual’s dying. The mixture of warm sauce and components that are risk-free, including gentle dish soap, is capable of preventing bugs that are several, including worms, backyard mites and caterpillars, without harming the plant or the gardener that is human.

Homemade Hot Sauce Spray

Add 2 Tbsp. Hot sauce drops one garlic, gentle dish soap and one-quart of water in to a blender. Blend the ingredients until the components are well-integrated. The dish soap should include no dyes or perfumes.

Allow the mixture before pouring it in to a spray bottle to sit overnight. Replace the bottle’s best before shaking it to re-incorporate the elements.

The hot sauce mixture onto the bugs. Begin in the very best of the plant and work your way down. This can not just smother and destroy the bugs that are current, but in addition repel any new types. Ensure that you spray the front together with the mixture on the rear of the leaves.

Shake the bottle occasionally throughout program and continue before the bugs have dropped off to spray the plant. Reapply the spray in the event that you discover extra bugs starting to collect on the plant that is affected.

Soak a cotton ball in warm sauce. Place a solitary cotton-ball on the soil of a potted plant or balls in your backyard. The the new pepper serves as a repellent.

See related

The best way to Trim Daylily Leaves

The best way to Trim Daylily Leaves

The daylily flower (Hemerocallis spp.) might only stay for one-day, but the crops offer summer-long attractiveness because they continue to create clean buds and blooms for many months months. These low-maintenance plants need little care. Trims through the summer keep the plants blooming at their peak and looking their finest. Trimming AIDS in preventing pest and disease issues, as foliage is removed by you before it becomes a goal for infestation.

Cut lifeless leaves out in the root of the plant with shears. Trim broken leaves down to the region that is undamaged as preferred, or take them off entirely. Trim out lifeless and broken leaves from spring through fall throughout the growing period, at any given moment.

Old flower stems one to two inches in the bottom, but abandon the foliage that is green . Do this once the buds have opened and completed blooming.

When the foliage begins to yellow, prune the plant to within 2″ of the floor and die in fall. Remove the plant materials that is old and discard it.

See related

Varieties of Parsley

Varieties of Parsley

Parsley (Petroselinum crispum) consists of three main types: curled leaf or frequent parsley, flat-leaf or Italian parsley, as well as the lesser-known Hamburg or turnip-rooted parsley. You will find a number of cultivars within each range. Each one is healthy, colorful, flavorful and fragrant even though the three types have different uses in the kitchen.

Curled Leaf

In the U.S., curled leaf parsley (var. crispum) is the most typical range. It’s used as a garnish and is usually dried for use in other dishes and stews, soups. Curled leaf parsley contains a number of cultivars including Decorator, a dark-green, thick-leaved parsley; Forest-Green, a warmth-tolerant parsley with pleasurable taste and bunching development practice; long-stemmed Pagoda; and and additional curly types including Extra Triple Curled and Frisca.

Flat Leaf

Flat-leaf parsley (var. neapolitanum Danert) has more taste than curled leaf parsley and is used in soups, salads, stews and sauces. Cultivars contain Italian Darkgreen, with a stronger taste as well as strong stems Gigante Catalogno with big leaves; as well as the dark-green, fast growing Italian Leaf.

Hamburg

Hamburg parsley (var. tuberosum), also called German parsley, is available in specialty and ethnic markets. Hamburg is employed not for its leaves but also for the root, which reaches lengths of 8 to 10″. It’s chopped-up and integrated in to stew or soup or fried.

Starting Seeds Indoors

Prior to the last frost in your region, plant parsley seed indoors for an earlier start. Fill little pots with planting medium that was commercial formulated for starting seeds. Peat pots are successful as the pots are planted right to the soil, avoiding shock to the roots that are parsley. Plant a pinch of the small seeds on the the top of mix, and then press the seeds to the soil. Cover the pots with plastic to keep the seeds moist and warm. Place the pots in in-direct sunlight and keep the soil somewhat moist when the soil feels dry by misting. Plant the seedlings in the backyard when all threat of of frost h-AS handed in spring.

Planting Out Doors

Parsley needs a sunny area and properly-drained, abundant s Oil. To prepare the planting region, spade the s Oil to some depth around 8″. Spread 2 to 3″ of natural issue like compost or manure on the soil, then dig the natural issue to the soil. Plant the seedlings in the rows 1-0 to one foot aside. Water seriously every week, saturating the s Oil to some depth of 8″ to assure the root location is saturated. It is possible to also obtain seedlings that are proven from a nursery. A choice technique will be to plant the seeds straight in the backyard when the climate warms in spring However, commencing seeds in-doors outcomes in an early in the day harvest.

See related

Bugs that are agave

Bugs that are agave

Agave (Agavaceae) crops produce aesthetically-pleasing vegetation in xeriscape gardens, areas with low water crops. Similar in look to cacti are perennials with fleshy leaves which are lined with sharp teeth. They range from tiny crops which are ideal for in-doors -foot-tall buildings with stems that can tower above leaves for up to 40-feet in size. Enemies of agave contain several kinds of bugs that could mar the plant’s look and lead to serious injury.

Scale Bugs

Scales contain three kinds of bugs and more than 1 1000 species in The United States. Agave can be seriously damaged by this varied team of bugs by feeding on sap and piercing the flesh of crops. Plants have discolored development. Delicate scales armored scales and mealybugs all fit in with the scale insect family. Armored scales that assault agave contain latania scale (Hemiberlesia lataniae), oleander scale (Aspidiotus nerii) and oystershell scale (Lepidosaphes ulmi). They’ve a tough covering to safeguard their the eggs of women as well as their their health. As well as sap that is sucking, mealybugs and delicate scales generate waste called honeydew. Black mould grows on the honeydew, creating further injury to crops. Soft scales that prey on agave contain the hemispherical species (Saissetia coffeae). The mealy bug enemy of the plant is the huge yucca mealy bug (Puto yuccae).

Snout Weevils

Snout weevils (Scyphophorus acupunctatus) are significant pests and feed on several species of agave. The brownish- bugs are about a half-inch-long and have long snouts. They depart wounds that are rotting and chew on crops. Snout weevils lay eggs in the bottom of the agave. The larvae feed to the plant’s succulent core. As tissue rot develops damaged crops start to collapse, plus they ultimately die.

Leaf-footed Plant Bugs

When leaf-footed plant bugs pierce the flesh of agave, they abandon a mild yellow scar on the plant. They’re bigger than snout weevils and scales, and they are able to grow as much as an inch long. They may be easily recognizable. They’ve a head, a brown narrow-body along with a white band on the other side of the rear. During winter, they discover guarded places like tree-trunk cracks, woodpiles and piles .

Pest Control

Controlling the existence of bugs that are agave contains a combination of of techniques. Natural enemies like parasitic wasps that consume scales might help manage pest populations. Low- infestations can be eradicated by poisonous remedies of insecticidal soap and horticultural oil sprays. Commercially obtainable spray pesticides that are stronger can eliminate pests, however they might damage crops that are nearby and eliminate advantageous bugs.

See related